Member-only story
Mastering UI States in Jetpack Compose with sealed class
3 min readNov 26, 2024

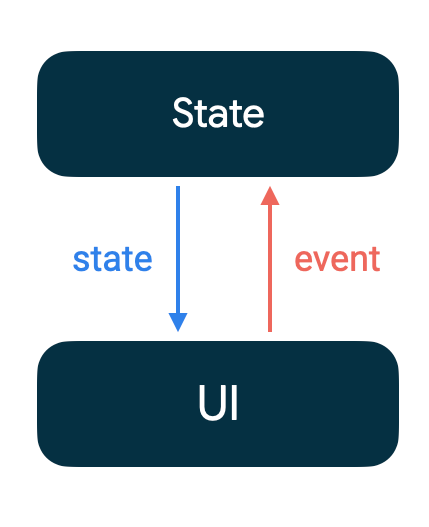
Jetpack Compose simplifies building modern UIs in Android, but managing different states of the UI — like loading, success, and error — can still be a challenge. In this article, we’ll explore how to handle UI states effectively using a sealed class in combination with StateFlow and Compose.
Why Use a sealed class for UI States?
sealed class in Kotlin allows you to create a restricted hierarchy of classes, making it perfect for representing finite UI states like Loading, Error, and Data.
With this approach:
- You gain type safety, ensuring each state is handled explicitly.
- It’s clean and scalable, as adding new states only requires creating a new subclass.
- Your UI code becomes reactive and declarative.
Implementation: Step-by-Step
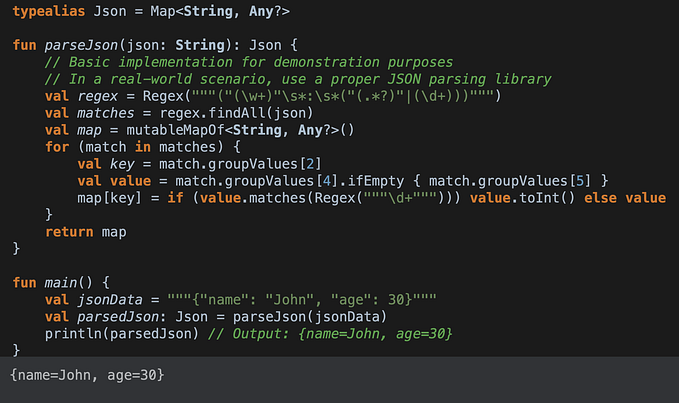
1. Define the UIState Sealed Class
First, create a UIState class with three states: Loading, Error, and Data.
sealed class UIState<out T> {
    object Loading : UIState<Nothing>()
    data class Error(val message: String) : UIState<Nothing>()
    data class Data<T>(val data: T) : UIState<T>()
}
2. Build the ViewModel
The ViewModel will hold the current UIState and update it based on the app’s logic.
import androidx.lifecycle.ViewModel
import androidx.lifecycle.viewModelScope
import kotlinx.coroutines.delay
import kotlinx.coroutines.flow.MutableStateFlow
import kotlinx.coroutines.flow.StateFlow
import kotlinx.coroutines.launch

class MainViewModel : ViewModel() {
    private val _uiState = MutableStateFlow<UIState<String>>(UIState.Loading)
    val uiState: StateFlow<UIState<String>> = _uiState

    init {
        fetchData()
    }

    private fun fetchData() {
        viewModelScope.launch {
            delay(2000) // Simulate loading
            val success = true // Simulate success or failure
            _uiState.value = if (success) {
                UIState.Data("Hello, Jetpack Compose!")
            } else {
                UIState.Error("Something went wrong")
            }
        }
    }
}